You buy the bags. You mix everything. Then halfway through, you run out. Sound familiar? Running short on concrete in the middle of a project is one of the most frustrating things that can happen on a job site. And going back to the store costs you time, money, and honestly, a lot of patience.
That’s exactly why a concrete calculator exists. You put in your numbers, length, width, and thickness, and it tells you how many cubic yards or bags you need before you buy a single thing. No guessing. No waste. No second trips.
Whether you’re pouring a concrete slab for a patio, digging footings for a fence, or filling a column, this tool does the math for you in seconds.
Honestly, I learned this the hard way. The first time I poured a small concrete slab for a garden path, I bought exactly the amount I thought I needed. No extra, no buffer. Big mistake. Halfway through, the mix ran short and I had a half-finished slab sitting in the sun, drying unevenly while I rushed back to the store.
Here’s the simple rule that saves you every time, always add 5 to 10% extra on top of whatever your concrete calculator gives you. That small buffer covers spillage, uneven ground, and those little unexpected spots that need more volume than you planned.
The reason this matters so much is that concrete doesn’t wait for you. Once you start mixing, the clock is ticking. Curing begins almost right away, and if you stop mid-pour to go buy more bags, you’ll likely end up with weak joints, uneven surfaces, or a slab that cracks later.
Also, don’t forget about uneven subgrade. If your ground isn’t perfectly flat, and it rarely is, you’ll use more concrete than your measurements suggest. A slight dip in the ground can eat up an extra bag or two without you even noticing.
So before you order anything, run your numbers through the calculator, then bump that final number up by 5 to 10%. It costs almost nothing extra upfront, but it saves you a whole lot of stress on the day.
Now I have the full picture of every shape, input field, and output the calculator produces. Let me write the section.
| Weight needed | |
| Using 60-lb bags | |
| Using 80-lb bags |
You buy the bags. You mix everything. Then halfway through, you run out. Sound familiar? Running short on concrete in the middle of a project is one of the most frustrating things that can happen on a job site. And going back to the store costs you time, money, and honestly, a lot of patience.
That’s exactly why a concrete calculator exists. You put in your numbers, length, width, and thickness, and it tells you how many cubic yards or bags you need before you buy a single thing. No guessing. No waste. No second trips.
Whether you’re pouring a concrete slab for a patio, digging footings for a fence, or filling a column, this tool does the math for you in seconds.
Honestly, I learned this the hard way. The first time I poured a small concrete slab for a garden path, I bought exactly the amount I thought I needed. No extra, no buffer. Big mistake. Halfway through, the mix ran short and I had a half-finished slab sitting in the sun, drying unevenly while I rushed back to the store.
Here’s the simple rule that saves you every time, always add 5 to 10% extra on top of whatever your concrete calculator gives you. That small buffer covers spillage, uneven ground, and those little unexpected spots that need more volume than you planned.
The reason this matters so much is that concrete doesn’t wait for you. Once you start mixing, the clock is ticking. Curing begins almost right away, and if you stop mid-pour to go buy more bags, you’ll likely end up with weak joints, uneven surfaces, or a slab that cracks later.
Also, don’t forget about uneven subgrade. If your ground isn’t perfectly flat, and it rarely is, you’ll use more concrete than your measurements suggest. A slight dip in the ground can eat up an extra bag or two without you even noticing.
So before you order anything, run your numbers through the calculator, then bump that final number up by 5 to 10%. It costs almost nothing extra upfront, but it saves you a whole lot of stress on the day.
Now I have the full picture of every shape, input field, and output the calculator produces. Let me write the section.

Using this concrete calculator is really easy. You don’t need to be good at math. You just need a tape measure and two minutes of your time.
Here’s exactly how it works, step by step.
| 1 | Select Your ShapeAt the top of the calculator, you’ll see five shape options. Choose the one that matches your project:
Just click the one that fits what you’re pouring. The form below will change to match your shape. |
| 2 | Enter Your MeasurementsNow type in your numbers. Each shape asks for different things, so here’s a quick look at what you’ll need:
Next to each number, there’s a dropdown menu where you can choose your unit, feet, inches, yards, meters, or centimeters. So don’t worry if you measured in centimeters, just select the right unit and the calculator does the rest. |
| 3 | Add Optional Cost There’s a small box below the measurements where you can enter your price per bag and choose your currency. This part is optional. But if you fill it in, the calculator will show you the total estimated cost right along with your volume results. Pretty handy when you’re budgeting a job. |
| 4 | Click “Calculate”
Hit the big orange “Calculate” button. In less than a second, you’ll see your results, including:
And if you entered a price: your estimated total cost |
| 5 | Save or share your results Once your numbers show up, you’ve got a few options. You can copy the results to your clipboard with one click and paste them into a message or a notes app. You can also download a clean PDF with all your inputs and results neatly laid out — great if you’re sharing the numbers with a contractor or keeping a record for yourself. Well, honestly, that PDF feature is one of my favorite parts. I’ve used it to send quick job estimates to clients without having to type anything out manually. If you need to start over, just hit the “Clear” button and everything resets. |
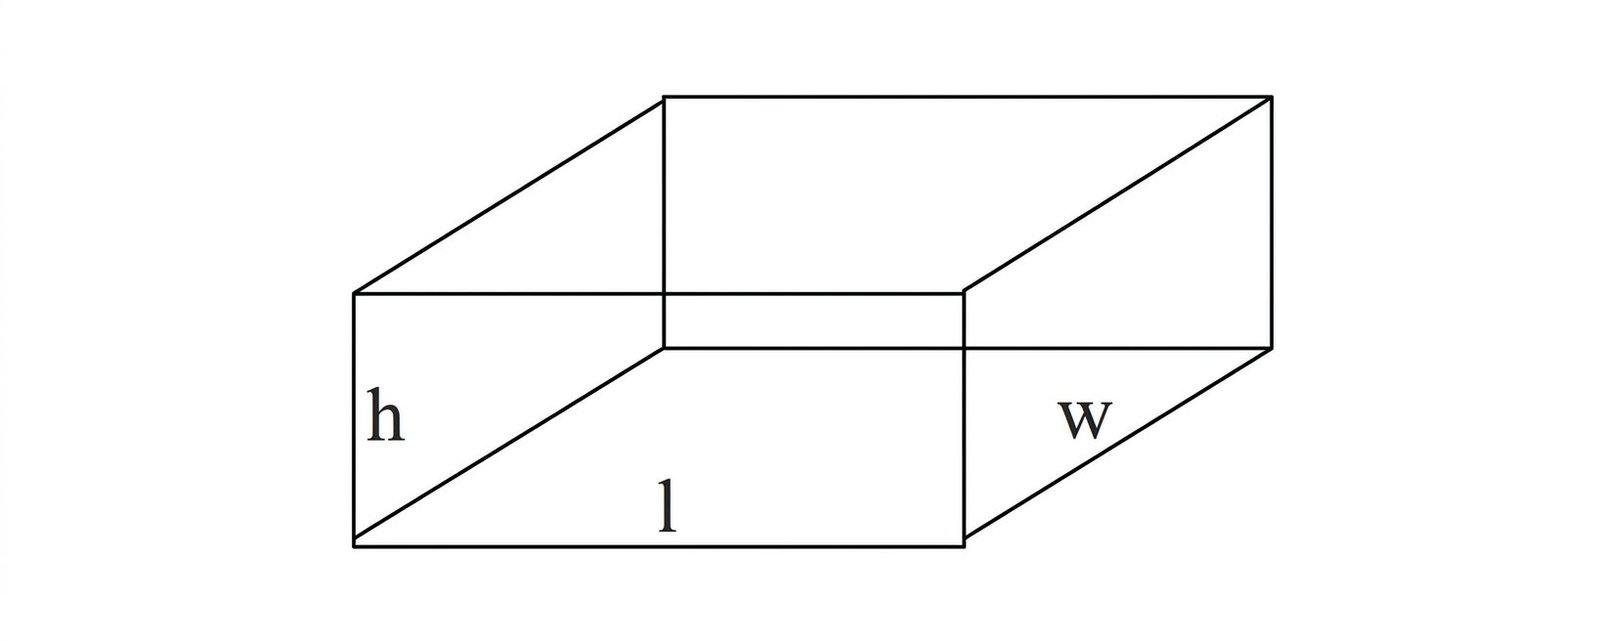
Let’s walk through a real example so you can see exactly how the math works. Say you want to pour a concrete slab for a backyard patio, 10 feet long, 10 feet wide, and 4 inches thick. This is probably the most common home project people calculate.
| 1 | Convert Thickness to Feet Convert 4 inches into feet by dividing by 12 → 4 ÷ 12 = 0.333 feet. |
| 2 | Calculate Volume Use the formula Length × Width × Thickness → 10 × 10 × 0.333 = 33.3 cubic feet. |
| 3 | Convert to Cubic Yards Divide by 27 (since 1 cubic yard = 27 cubic feet) → 33.3 ÷ 27 = 1.24 cubic yards. If you are also calculating the dirt you need to dig out or the mulch for the surrounding garden, our Cubic Yard Calculator is the perfect tool for those non-concrete volumes. |
| 4 | Add Waste Buffer Include an extra 5–10% for safety → round up to about 1.35 cubic yards. |
| 5 | Estimate Bag Count Divide by 0.022 (yield per 80 lb bag) → 1.24 ÷ 0.022 ≈ 56 bags of 80 lb concrete. |
The Magic Number Shortcut
Here’s a little trick that pros use all the time. If your slab is exactly 4 inches thick, you don’t even need the full formula. Just do this:
Square footage ÷ 81 = cubic yards needed
So for our example: 100 sq ft ÷ 81 = 1.23 cubic yards
Same answer, way faster. I use this one in my head on-site all the time when someone asks for a quick estimate. It won’t work for other thicknesses, just 4 inches, but that covers most home jobs like patios, walkways, and driveways.
Quick Reference: Bags Per Cubic Yard by Bag Size
Already know your volume? Here’s how many bags you’ll need depending on the size you buy.
| Bag Size | Bags per ½ cu yd | Bags per 1 cu yd |
|---|---|---|
| 40 lb | 51 | 101 |
| 60 lb | 34 | 67 |
| 80 lb | 25 | 51 |
Remember, these numbers don’t include your waste buffer. Add 5 to 10% on top of whatever the table shows.
This is a question almost every first-time builder asks. And the honest answer is, it depends on how big your project is.
For small jobs, bags are the right call. Things like a garden path, a fence post hole, a small footing, or a single column, these don’t need a whole truck. You grab a few 60 lb or 80 lb bags from the store, mix them yourself, and you’re done.

For bigger jobs, a full concrete driveway, a large patio slab, or a garage floor, ordering by the cubic yard from a ready-mix plant makes much more sense. Mixing bag after bag by hand for a 300 sq ft driveway would take forever. And you’d be exhausted before the job even got halfway done.
A good rule I follow: if your project needs more than half a cubic yard, call the ready-mix plant. If it’s less than that, grab bags.
As one pro put it, “Just call your local ready-mix plant, give them your square footage and thickness, and they’ll figure it up for you.” Most plants are used to these calls and will guide you through the whole order in a few minutes.
When you do order ready-mix, the standard unit is the cubic yard. Have your number ready before you call, and don’t forget to tell them if you need it delivered at a specific time, since curing starts the moment the truck begins mixing.
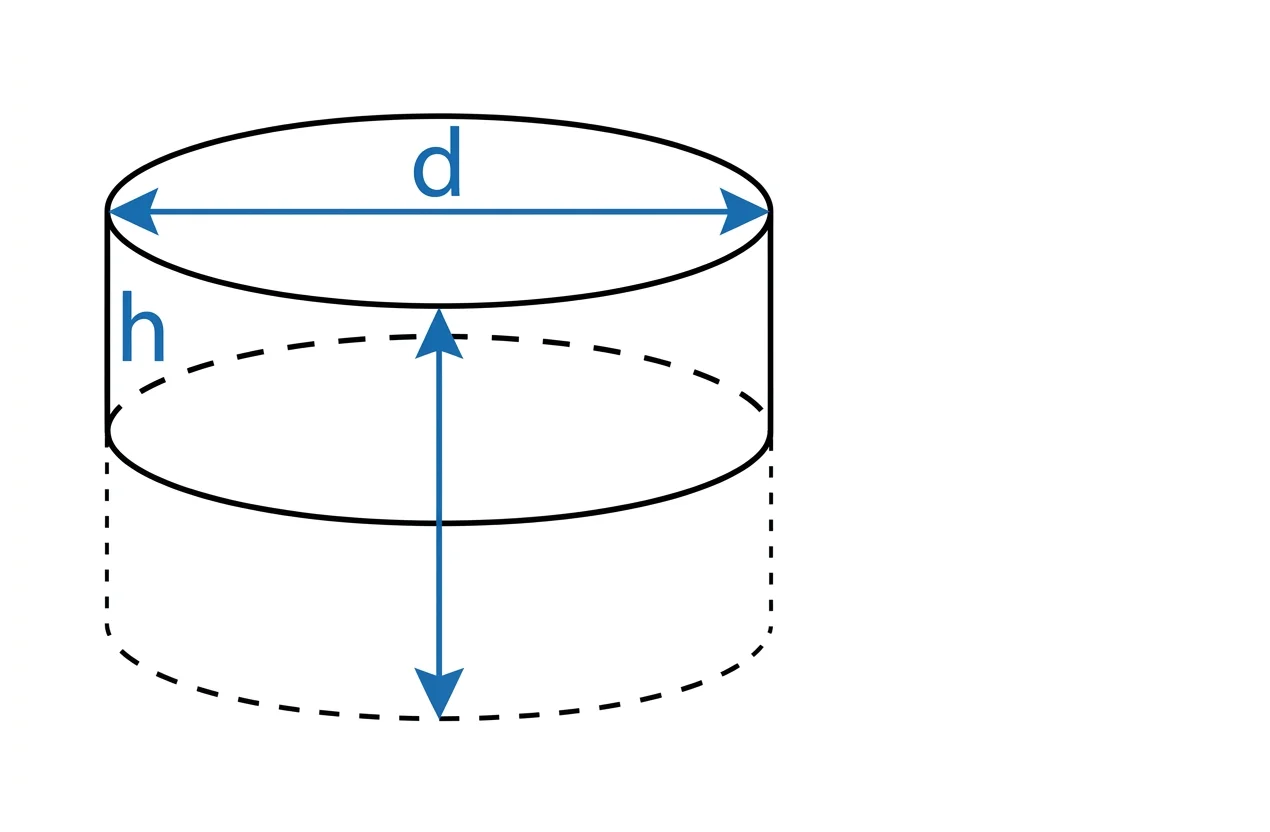
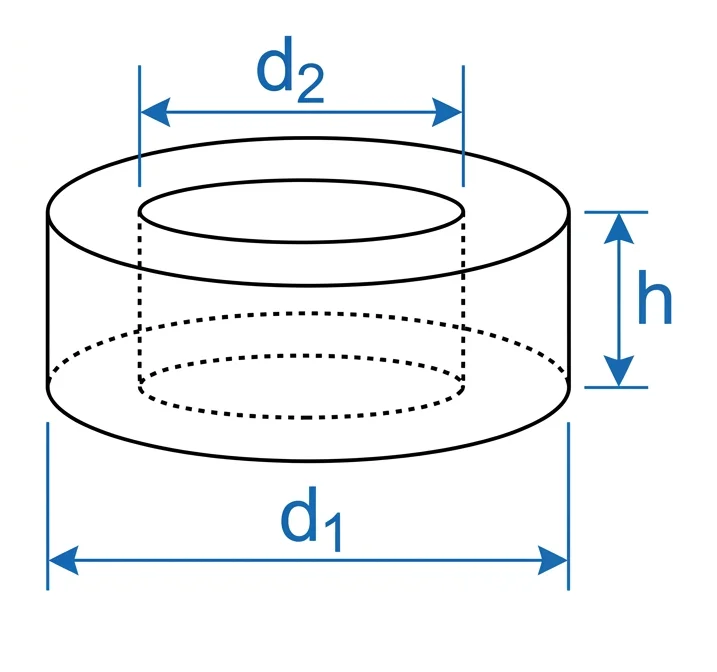
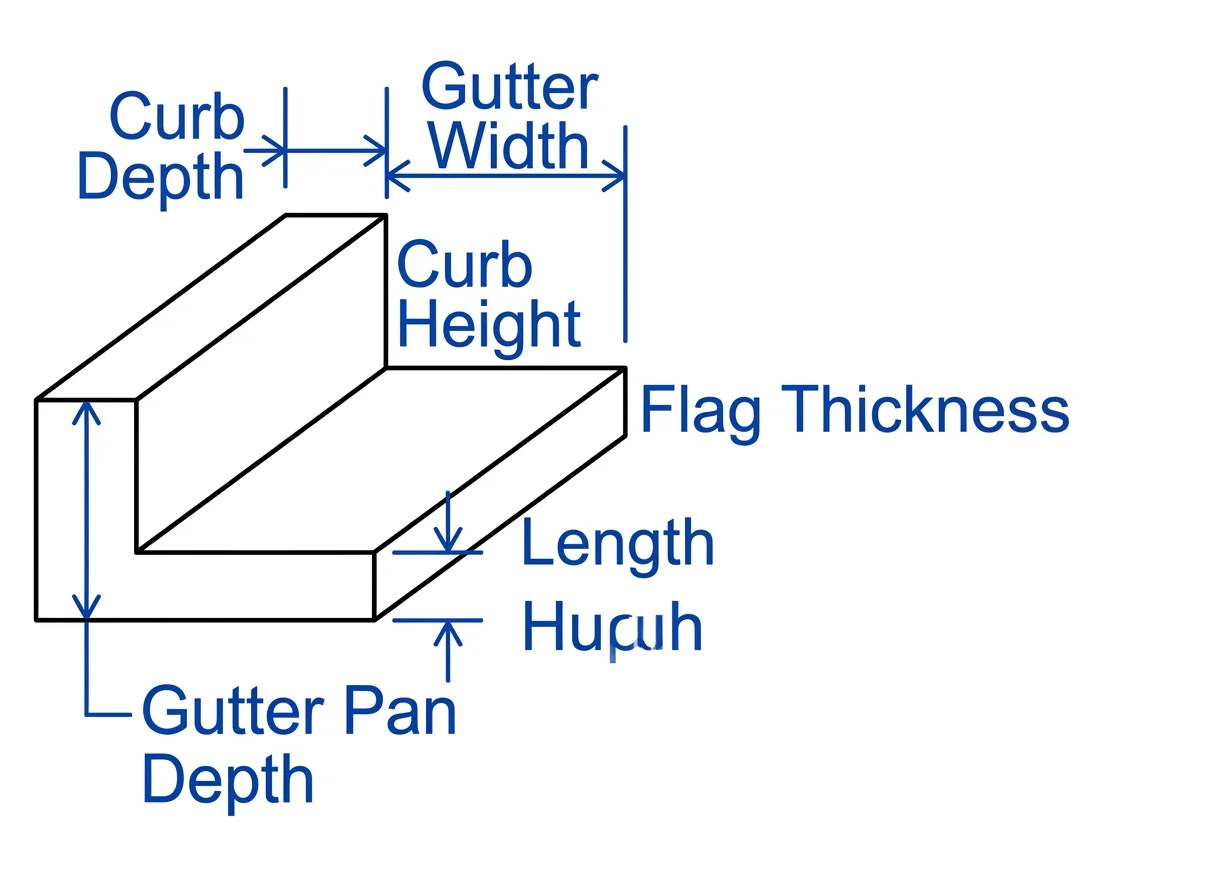
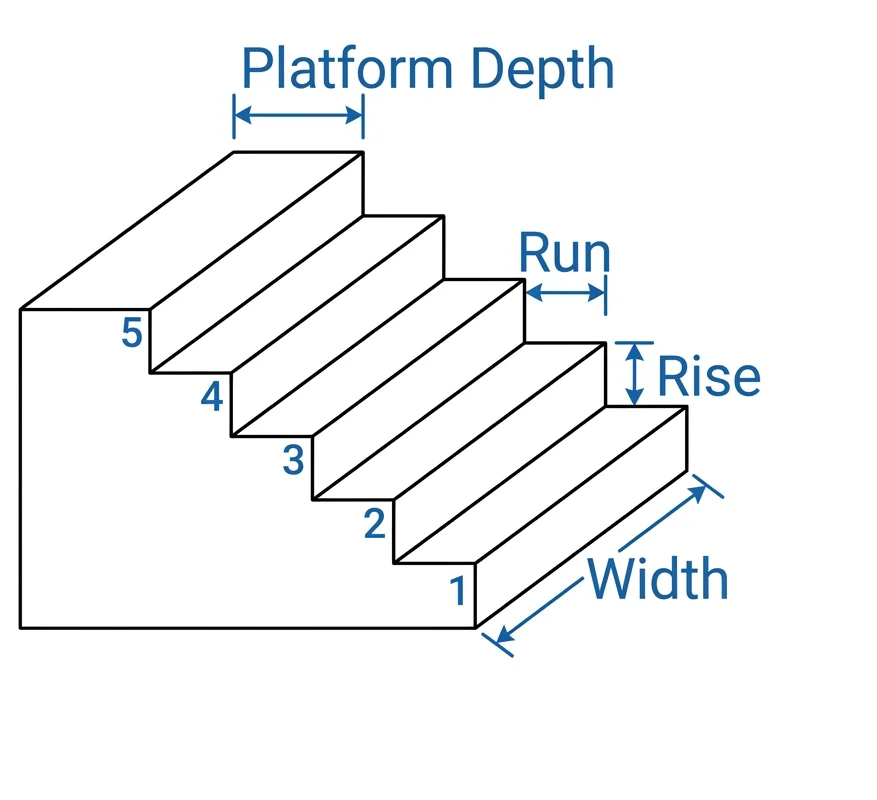
Every shape in this concrete calculator uses a different formula to find the volume. Here’s a quick look at each one.
A lot of people use these two words like they mean the same thing. They don’t. Cement is just one ingredient, it’s the binder made from limestone and clay that holds everything together. Concrete is the final mix, cement plus water, sand, and gravel all combined. Think of it this way: cement is like flour, and concrete is the finished bread.
Portland cement is the most common type used in construction. As defined by ASTM International (specifically ASTM C150), Portland cement is a hydraulic cement produced by pulverizing clinker, which consists of hydraulic calcium silicates. This scientific standard ensures that the concrete you pour today has a predictable strength and set time.
Concrete has four basic things in it:
Pro Tip: Most slabs require a solid 4-inch base of stones for drainage; you can use our Gravel Calculator to figure out how much to order for your sub-base.
Sometimes builders also add mineral pigments for color, or other additives to make it dry faster or stronger.
For a plain poured concrete slab, expect to pay between $6.50 and $10.50 per square foot. However, prices vary wildly based on your local labor rates and the thickness of the pour.
For a full breakdown of professional installation versus DIY pricing, check out our dedicated Concrete Cost Calculator to get a more precise estimate for your zip code.
If you want something fancier, like stamped concrete or stained concrete, the cost goes up. Decorative finishes take more time and skill, so they carry a higher price tag.
Calculating concrete doesn’t have to be stressful. With the right numbers and a good concrete calculator, you can figure out exactly how many bags or cubic yards you need before you spend anything. If your project involves more than just a pour, feel free to browse our other Concrete and Construction Tools to help your entire build go smoothly.
The big things to remember, measure your length, width, and thickness carefully. Always add 5 to 10% for spillage and waste. And choose bags for small jobs, ready-mix for the big ones.
Save this page to your home screen so it’s always one tap away when you’re on site and need a quick answer.
Have a project coming up? I’d love to hear how it goes. Drop your questions below, happy to help.
You need 51 bags. Each 80 lb bag gives you about 0.6 cubic feet of concrete. Since one cubic yard equals 27 cubic feet, you divide 27 by 0.6 and get 45, then add 5 to 10% for waste, and you’re at around 51 bags. Always round up, never down.
It depends on how thick you pour it. At 4 inches thick, you need about 1.24 cubic yards, that’s roughly 56 bags of 80 lb concrete. At 6 inches thick, that goes up to 1.85 cubic yards, or about 84 bags. Use the calculator above to get the exact number for your thickness.
A 50 lb bag gives you approximately 0.375 cubic feet of concrete. So if you need 1 cubic yard (which is 27 cubic feet), you’d need around 72 bags of the 50 lb size. Not the most efficient bag size for big jobs — 80 lb bags cover more ground per bag.
Cement is an ingredient. Concrete is the final product. Cement, made from limestone and clay, acts as the binder that holds everything together. When you mix it with water, sand, and gravel, you get concrete. So every batch of concrete has cement in it, but cement on its own is not concrete.
It sets in about 2 to 3 hours. You can walk on it after 24 to 48 hours. But full curing, when it hits around 99% compressive strength, takes 28 days. And honestly, it keeps getting a little stronger for up to 3 years after that. Temperature, thickness, and the type of cement in the mix all affect how fast it cures.